Need a quick backend for your frontend development or testing without writing a full-fledged server? Using json server is a fantastic way to create a free fake rest api in minutes. When you need to simulate security layers, specifically json web tokens (jwt), integrating jwt auth with your json server becomes essential.
This guide will show you exactly how to build a fake api jwt json server, providing a fake api that runs locally to empower your frontend workflow.
What is a fake api with jwt authentication?
A fake api jwt json server is a zero-configuration tool that lets you create a fake rest api using json-server from a simple json file. By adding a custom web token layer, you can simulate a real-world auth user experience.
Why Use jwt auth with a json api?
- Frontend Security Testing: Simulate auth jwt login, access token handling, and protected routes.
- Development Efficiency: Decouple frontend and backend teams so they can work independently.
- Realistic Environment: Test how your response handling works with json web web tokens, including refresh token logic and status code management.
Step-by-Step Guide: create Your fake api
1. Initialize Your github Ready Project
Create a new directory for your fake api and initialize it with npm to track your dependencies.
Bash
mkdir fake-jwt-api
cd fake-jwt-api
npm init -y
2. Install json-server and jsonwebtoken
We’ll use json-server for the server and jsonwebtoken to handle the json web signatures. You can also install faker if you want to generate massive amounts of dummy data.
Bash
npm install json-server jsonwebtoken --save-dev
3. Create Your json Database (db.json)
This file stores your data. We’ll include a user array with a username and password to auth user credentials.
JSON
{
  "posts": [{ "id": 1, "title": "Using JSON Server", "author": "dev" }],
  "users": [
    { "id": 1, "username": "admin", "password": "password123", "role": "admin" }
  ]
}
4. Custom jwt authentication Middleware (server.js)
To handle json web tokens (jwt), we need a custom server file. This script will intercept the request, check the req body, and return a res json response.
JavaScript
const jsonServer = require('json-server');
const jwt = require('jsonwebtoken');
const bodyParser = require('body-parser');

const server = jsonServer.create();
const router = jsonServer.router('db.json');
const SECRET_KEY = '123456789';
const expiresIn = '1h';

server.use(bodyParser.urlencoded({ extended: true }));
server.use(bodyParser.json());

// Function to create a web token
function createToken(payload){
  return jwt.sign(payload, SECRET_KEY, { expiresIn });
}

// Logic to check if user exists
function isAuthenticated({username, password}){
  const db = router.db.getState();
  return db.users.findIndex(user => user.username === username && user.password === password) !== -1;
}

// Login route to get an access token
server.post('/auth/login', (req, res) => {
  const { username, password } = req.body;
  if (isAuthenticated({ username, password })) {
    const accessToken = createToken({ username });
    res.status(200).json({ accessToken });
  } else {
    res.status(401).json({ message: 'Incorrect username or password' });
  }
});

// Middleware to verify auth jwt on protected routes
server.use(/^(?!\/auth).*$/, (req, res, next) => {
  if (req.headers.authorization === undefined || req.headers.authorization.split(' ')[0] !== 'Bearer') {
    res.status(401).json({ status: 401, message: 'Error in authorization format' });
    return;
  }
  try {
    jwt.verify(req.headers.authorization.split(' ')[1], SECRET_KEY);
    next();
  } catch (err) {
    res.status(401).json({ status: 401, message: 'Access token is invalid' });
  }
});

server.use(router);
server.listen(3000, () => { console.log('Fake API JWT Server is running...'); });
5. Testing Your fake rest api using json-server
Get Your access token
Send a request to your localhost server using curl or Postman. Check the req body to ensure your password matches.
Bash
curl -X POST -H "Content-Type: application/json" -d '{
  "username": "admin",
  "password": "password123"
}' http://localhost:3000/auth/login
Access Protected data
Once you have the access token, include it in the header of your next request to get a successful res from the server.
Bash
curl -H "Authorization: Bearer YOUR_TOKEN_HERE" http://localhost:3000/posts
Key security and user Considerations
- Refresh Token: For a more advanced fake api, you can implement a refresh token route to simulate long-lived sessions.
- Faker Integration: If you need more data, use the faker library to populate your
db.jsonautomatically. - Github Deployment: You can push this to github and use services like Glitch or Railway to host your fake api for free.
Conclusion
Setting up a fake api jwt json server is the best way to develop secure frontend applications without waiting for a backend team. By using json server and json web web tokens, you create a realistic access environment that handles status codes and authentication token logic perfectly.
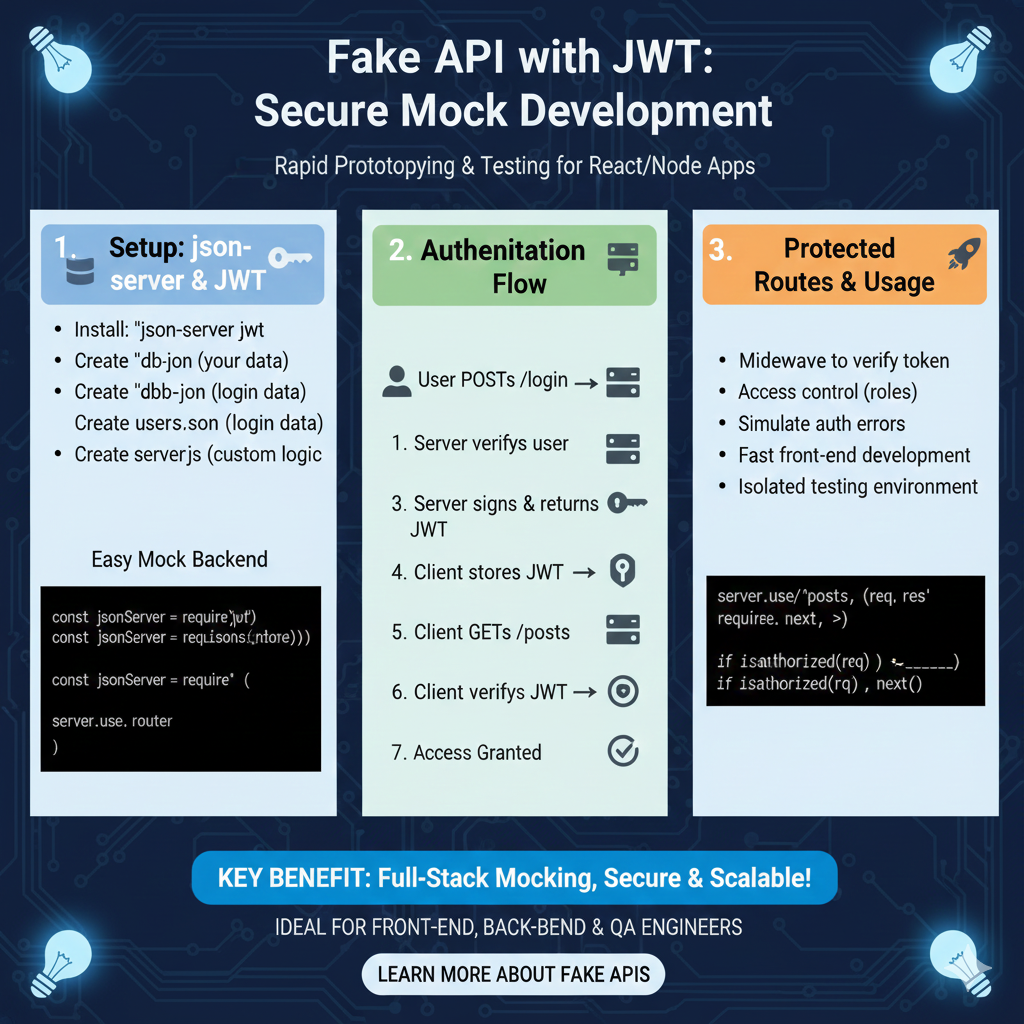
The infographic titled “Fake API with JWT: Secure Mock Development” provides a technical roadmap for rapid prototyping and testing for React and Node applications by simulating a secure backend environment.
🛠️ Building a Secure Mock Environment
This guide details a three-step process to set up and utilize a mock server that includes authentication logic:
1. Setup: json-server & JWT (Blue)
This initial phase covers the installation and data configuration required for an easy mock backend:
- Installation: Start by installing the
json-server-jwtpackage. - Data Structure: Create a
db.jsonfor your main data and ausers.jsonspecifically for login credentials. - Custom Logic: Develop a
server.jsfile to handle custom routing and logic. - Code Implementation: Use boilerplate code to require the necessary modules and initialize the server router.
2. Authentication Flow (Green)
This section illustrates the sequence of events between the user and the mock server:
- Login Request: The user initiates a
POSTrequest to the/loginendpoint. - Verification & Token Issuance: The server verifies the user credentials, signs a JWT, and returns it to the client.
- Client Management: The client stores the received JWT locally.
- Authorized Request: The client sends a
GETrequest (e.g., to/posts) and includes the token for verification. - Access Granted: Once the server verifies the JWT, access is granted to the protected data.
3. Protected Routes & Usage (Orange)
The final pillar explores advanced middleware and the practical benefits of this setup:
- Middleware Implementation: Use middleware to verify tokens and manage role-based access control.
- Testing Capabilities: Simulate authentication errors and create an isolated testing environment.
- Efficiency: Enables fast front-end development without waiting for a completed production backend.
- Code Example: Includes a server logic snippet showing how to check if a request is authorized before calling
next().
learn for more knowledge
Mykeywordrank-> Search for SEO: The Ultimate Guide to Keyword Research and SEO Site Checkup – keyword rank checker
json web token->React JWT: How to Build a Secure React Application with JSON Web Token – json web token
Json Compare ->Compare JSON Data Using a JSON Compare Tool for JSON Data – online json comparator
json Parser->Mastering JSON: The Ultimate Guide to json parse tool and How to Use Them – json parse
Leave a Reply