Introduction: Streamline Your Development with JSON Server
As a client application developer, you often find yourself waiting for the backend API to be ready, or needing a quick way to prototype and test your application’s data fetching logic. This is where JSON Server comes to the rescue! It allows you to create a full fake REST API in less than a minute with zero coding. This guide will walk you through how to create a fake REST API with JSON Server, making your development workflow smoother and more efficient for testing your APIs.
What is JSON Server and the REST Uniform Interface?
JSON Server is a standalone Node.js module that enables you to create a RESTful API (a REST API) from a simple JSON file. It’s incredibly useful for mocking data, frontend prototyping, and testing purposes, giving you full CRUD operations out of the box, essentially acting as a mock service or test api.
Key Characteristics of REST APIs
The REST (Representational State Transfer) architectural style, which JSON Server mimics, is defined by several constraints, including the uniform interface. The uniform interface constraint dictates a standard way of interacting with resources regardless of the request origin. A typical REST API interaction involves the client sending an API request and receiving REST responses, often accompanied by $\text{HTTP}$ status codes.
Step 1: Install JSON Server Globally (Node.js Service)
The easiest way to get started is to install JSON Server globally using npm or yarn. This establishes the core service on your server (Node js).
Bash
npm install -g json-server
# Or, if you prefer Yarn:
# yarn global add json-server
Step 2: Create Your Data File (db.json)
Create a new file named db.json. This file will serve as the data source for your fake API. You define your resources (e.g., posts, comments, users) within this file, creating the fundamental rest resource for the API.
JSON
{
  "posts": [
    { "id": 1, "title": "json-server", "author": "typicode" }
  ],
  "comments": [
    { "id": 1, "body": "some comment", "postId": 1 }
  ],
  "profile": { "name": "typicode" }
}
Step 3: Start JSON Server
Navigate to your project directory and start JSON Server. This command instructs the application to watch the data file and create the public endpoints.
Bash
json-server --watch db.json
Exploring Your Fake REST API: Resource Methods
Now you can interact with your API just like a real one, leveraging the resource methods of the REST uniform interface:
- GET all posts:
GET /posts(Retrieves resource representation) - POST a new post:
POST /posts(API requests should specify the media type via Content-Type application JSON header, adhering to HAT principles) - PUT/PATCH/DELETE: Use these resource methods for updating and deleting a single rest resource (e.g.,
PUT /posts/1).
Advanced Querying and Filtering
JSON Server supports advanced features essential for a real-world REST API, allowing the client to customize the request:
- Filtering:
GET /posts?author=typicode - Pagination:
GET /posts?_page=2&_limit=10 - Sorting:
GET /posts?_sort=title&_order=asc
Testing and Integration
You can test these API requests and verify the REST responses using a client like Postman or directly connecting the fake API to your client application. This simplifies integration testing for your rest apis and services.
Conclusion
JSON Server is an incredibly powerful yet simple tool that can significantly accelerate your development workflow. By mastering how to create a fake REST API with JSON Server, you gain a fully functional, REST-compliant fake API that speeds up testing, allows you to quickly connect your application to a temporary service, and simplifies development against a fixed set of resources.
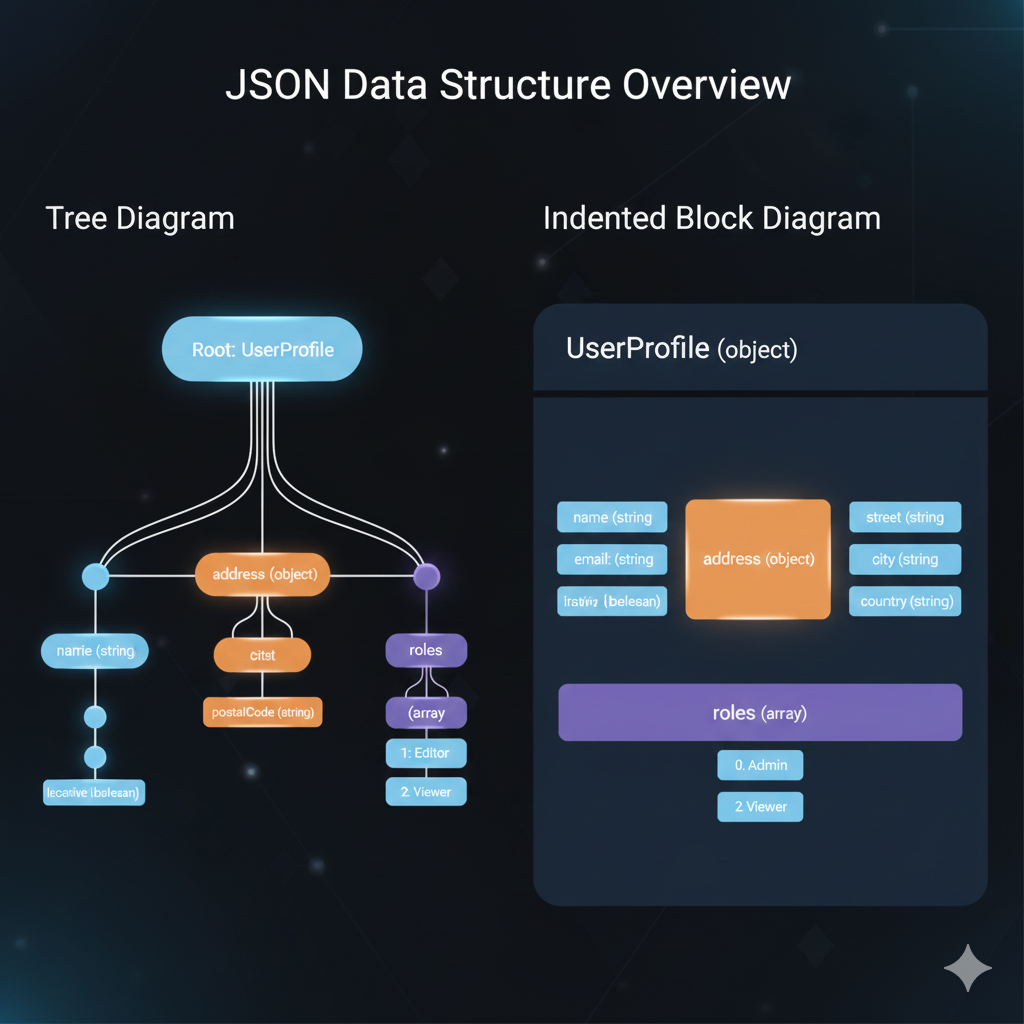
1. Tree Diagram (Left)
The Tree Diagram shows the hierarchical relationships clearly, with the root at the top and branches connecting objects (nodes) to their keys.
- Root: Starts with the UserProfile object.
- Key Properties: The UserProfile directly contains primary keys:
name(string)address(object)roles(array)
- Nesting:
- The
namekey has nested properties:isActive(boolean). - The
addressobject containscity(object) andpostalCode(string). - The
cityobject further containsstreet(string),city(string), andcountry(string) (Note: The diagram structure seems to showstreet,city, andcountryas direct children of theaddressobject, alongside a nestedcityobject, which suggests a potentially confusing or redundant structure in the mock data).
- The
- Arrays: The
roleskey is an array containing two items:1: Editorand2: Viewer.
2. Indented Block Diagram (Right)
The Indented Block Diagram uses nested, colored boxes to represent the structure, mimicking the indentation of the raw JSON code for a UserProfile (object).
- Primary Keys: The top-level block shows the direct keys of the UserProfile object:
name(string)email(string)isActive(boolean)address(object)roles(array)
- Nesting:
- The
address(object) block is nested and contains its own keys:street(string),city(string), andcountry(string). - The
roles(array) block is nested and lists its elements:0: Adminand2: Viewer(Note: The diagram lists0: Adminand2: Viewer, which is slightly different from the Tree Diagram’s array content).
- The
Summary of Infographic Purpose
These visualizations are excellent tools for:
- Understanding the Schema: They quickly convey the names, data types, and nesting levels of the keys within the JSON.
- Documentation: They serve as clear, non-code documentation for developers working with an API that uses this JSON structure.
- Training: They help visualize complex hierarchical data without requiring the user to read long blocks of text-based JSON.
learn for more knowledge
Json Parser ->WHAT IS API JSON Parser – JSON Parser API – JSON.parse – json parse
Json web token ->What Is OneSpan Token – json web token
Json Compare ->What Is JSON Diff Online? (Beginner-Friendly Explanation) – online json comparator
Mykeywordrank->Google Website Rank Checker- Track Your Keyword Rank and SEO Performance – keyword rank checker
Leave a Reply